Friday, 30 June 2017
Tecno H5 New OS variant 2 (Tecno H5-UP09-20140610-MP)
Tecno H5 New OS variant 2 (Tecno H5-UP09-20140610-MP)
Tecno H5 (MT6572_TECNO_H5__up09_tecno_h5__4.2.2__ALPS.JB3 )
Tecno H5 (MT6572_TECNO_H5__up09_tecno_h5__4.2.2__ALPS.JB3 )
Tecno F7 Phantom A+ 4.2 MT6589 Variant 2 (MTK Backup)
Tecno F7 Phantom A+ 4.2 MT6589 Variant 2 (MTK Backup)
Tecno F7 Phantom A+ 4.2 MT6589 Variant 1 (MTK Backup)
Tecno F7 Phantom A+ 4.2 MT6589 Variant 1 (MTK Backup)
Tecno C9 3+32GB Plus / Pro (C9-H535-B1-Cl-M-161129V83) [Miracle Box Dump]
Tecno C9 3+32GB Plus / Pro (C9-H535-B1-Cl-M-161129V83) [Miracle Box Dump] firmware
Tecno A7 Phantom Z Variant 2 (Tecno-A7-G906-A1-KK-EG-20141111)
Tecno A7 Phantom Z Variant 2 (Tecno-A7-G906-A1-KK-EG-20141111) firmware
Tecno Phantom A6S (Tecno-A6S-H551C1-M-KESF-160911V10 )
Tecno Phantom A6S (Tecno-A6S-H551C1-M-KESF-160911V10)

TECCNO P5 FLASH FILE
TECNO P5 UPDATE FIRMWARE

Tecno P5 Specs
Here are a few specs of the Tecno P5:- Status: Available, since September, 2013
- Mini SIM (Normal SIM) Dual-SIM, dual standby
- Dimensions: 124.3 x 65.5x 10.5 mm
- Weight: ?
- Storage: 4GB built-in storage (1GB available), supports up to 32GB microSD card
- Display: 4.0-inch Capacitive TFT Display (480 x 800 pixel resolution, 233 ppi)
- Camera: 5MP Camera with Flash
- 0.3MP front facing camera
- OS Platform: Android 4.2 OS (Jelly Bean)
- Processor: 1GHz Dual-core Processor
- Separate GPU
- 512MB RAM
- Colours: Black, White, Pink, Blue
- Wi-Fi
- Wi-Fi Hotspot
- Twitter, Facebook, Opera Mini
- GSM/EDGE 900/1800MHz
- WCDMA 2100MHz
- 3.5G Internet
- Chat, EMail, & Social Networking
- Music/Video Player
- Accelerometer, Proximity Sensor
- GMail
- Bluetooth 3.0
- USB 2.0
- FM Radio
- Voice Recording
- 1800mAH Battery Capacity
- Up to 8.5 Hours Talktime (3G)
- Up to 288 Hours Standby Time
Wednesday, 21 June 2017
UPGRADING COOLPAD 8295M, 8295 AND HOW TO BYPASS C.P.B INVALID OR EXTRACTION ERRORS ON YGDP TOOL
BYPASSING ERRORS WHEN UPGRADING OR HANDLING OF MOST COOLPAD CPB
STOCK ROM
The coolpad 8295m with mediatek processor and chipset is one of the devices that give out errors when it is being updated wrongly or in an unsupported environment which could make the user or the updater of the device to think the situation is out of hand because the errors can only solved with the use of proper observations and steps. The steps mentioned above would be the needed expertise that would lead to a successful operation in the task at hand. Since the coolpad 8295m and 8295 comes with and is powered by a mediatek processor, the Rom to be flashed on the device should be in the form of scatter related firmware but unfortunately the Rom is only flash-able with the use of CPB extraction software called YGDP tool as the Rom comes in CPB format in default so there is need for the use of an adequate and capable and as well corresponding tool made solely for the updating of coolpad devices with mediatek (CPU) this tool is normally called YGDP tool.
Updating Coolpad 8295m, Coolpad 8295 without Errors
Below are the necessary steps to take to successfully flash or update the 8295m Android device without annoying errors of (invalid CPB file) which come out as error warning most times.
a. Make use of a very strong and reliable USB cables to have a stable connection between PC and USB
b. Install correct and appropriate MediaTek driver since the device has (MTK) chipset
c. Make sure device is powered off and give it some minutes to fully power down
d. Open XGDP tool make use of the latest ( as it shows no extraction) errors hence it is more ideal and more recently patched
Navigate to the ( config ) segment of the tool and load the CPB file wait for the extraction to complete, after the process complete, navigate to the “C Drive” then open the YGDP folder which should be at the bottom of the drive then open the (download folders) which should be numerous in number from henceforth the firmware for the coolpad 8295m could be seen in scatter format hence the need or use of flash tool could be effectively employed.
Make use of SP Flash tool for the operation because the firmware has been extracted. Flash the device normally and wait for the first boot.
furthermore in the case of facing constant extraction errors when dealing with the extraction or loading of the normall firmware of a coolpad device it may be helpfull to use various version of YGDP TOOL .
find scatter after extraction
TO FIND SCATTER FILE AFter extraction open YGDP folder open all download folders listed in inside search and find scatter file after extraction done accurate
HOW TO FLASH XBO DEVICES TO AVOID BOOT LOOP
HOW TO PROPERLY FLASH AN XBO DEVICE TO AVOID
BOOTLOOP OR DEADBOOT FOR [TECHS]

In the present world and in the today’s ever changing and dynamics market trends there are a whole lot of Chinese mobile device brands in the Local & international market, these devices are widely used across all platforms as it is very crude in terms of its programming scope and not a daunting task to understand its internal work abilities and functions.
As it is widely and obvious that Nigeria is normally ranked high in the area of Chinese devices possession and use as well.
Since these devices are at constant use and also considering the fact that they are not high end devices, they are prone to developing hitches, faults, and some regular software issues along the way which include the following:- hanging, bootLoops, dead boots, display issues, battery drain or low battery life span etc.
Some of the top and widely used phones brands in Nigeria includes: Tec no, Infinix, Itel, XBO etc.
Let get to the point of this post therefore to talk about the dos and don’ts when flashing or updating an XBO Chinese mobile phone.
Here are the reasons why XBO devices die or have display issue after flashing.
As we all known the flashing of mobile devices require some necessary precautions which should be implemented and noted. The implementation should be at the appropriate time, hence if these precautions are not properly called to action at the right time when flashing XBO devices, there maybe issues or abnormality. Some of them are below…

Tips/precautions to implement:-
· Make sure battery charged above 30%
· Make use of quality USB cables
· Make sure software to be flashed is from a trusted and reputable source
· Do not interrupt the USB when the flashing oppression is still going on
· Do not plug or unplug any other devices from or on the pc when the operation is still running make sure to install the proper MediaTek devices driver, i.e MTK USB Vcom driver
FIXING NO SERVICE ISSUE ON SAMSUNG 19300
FIXING NO SERVICE ISSUE ON SAMSUNG GT-19300
INVALID IMEI UNKNOWN BASEBAND
Most times Samsung devices develop or exhibits some issues which would indicate they are due for some kind attentions some of the attentions may be in the form of software oriented errors or sometimes hardware disorders which may normally due to use and misuse of the most likely faults that are occasionally exhibited by Samsung devices that are powered by qualcomm processors includes:-

Network issues
Low battery Life
Occasional rebooting
Quick battery drain
Abnormal behaviors or malicious hijacking by unknown applications inconsistent network signal strength overheating which in turn drains the battery due to apps that maybe maliciously running in the background of the software.
How To Fix Network Related issues on Samsung 19300 ( dualcomm boot loades) Most times the Samsung device at hand normally develops issues which may make it less useful in the hands of its users, hence there will be the need for the appropriate attention of an engineer. Below are ways by which any network that is exhibited by Samsung 19300 maybe fixed:-
Flashing of repair firmwares created either by Samsung or by other developer engineers out there; these repair firmwares normally contains most of the files that would be needed to fix any area that may be under suppression or abnormality in the Android system.
If the device is exhibiting incorrect (IMEI Number) in the case that it shows imei as follows (04933921111) this shows the imei region has been corrupt hence there would be need for the repair or rewriting of the IMEI region. If the device shows unknown base band there would be the need to rewrite the [ EFS Region ] of the software Android system by flashing correct EFS File by [ Odin ] if the faults persist a combined flashing of repair firmwares with modern files could help restore the bricked device network issues.
HOW TO FLASH LENOVO DEVICES WITH QUALCOMM BOOTLOADERS
HOW TO FLASH LENOVO ADROID DEVICES WITH INBIULT QUALCOMM BOOTLOADER
Most devices that comes with Qualcomm bootloader for flashing the system may require some information and experience as well as a good working software environment when the need arises it is necessary to perform a system upgrade of flashing of a Qualcomm devices there are many tools to call upon to perform the task at various times depending on the devices whether for use of the local recovery or in the use of Qualcomm programmed flashing tools.


Steps To Take Before Flashing A Qualcomm Device.
Know and note down the software type to be flashed, whether it’s in the form of (Qsb) or in other formats.
Noting down the extension and format of the raw file of the flash file is an advanced step towards taking the next step.
Next step Is to choose to correct operating system to be used; one of the most friendly operating systems for successful flashing of Qualcomm devices is the reputable Windows called (Windows XP ) through old as it may seem but it’s very friendly and very compatible environment to setup a ground for mobile device flashing. Window XP unique features include installing devices drivers without flaws or conflicts. Install drivers without flaws or errors runs most programs under Admin right in its defaults settings hence easing the users the task of granting permissions to some useful programs without much work.
Flashing or Running Software – Firmware in The (MBN or Qsb) Format
Most firmware made for Qualcomm devices normally comes in (MBN)
Hence the Qualcomm flash tool is normally employed while applying such firmware on Qualcomm devices
Put the Qualcomm devices at hand to be upgraded in bootloader or download mode to enable good handshake of drivers with system, to be a little more professional there is a useful button combination to be pressed to launch the device at hand into the download mode so as to be easily detected by the flash tool.
Select the firmware then click the start button.
HOW TO FLASH QUALCOMM LG DEVICES, LG E400 OPTIMUS L3 UPGRADE GUIDE
HOW TO FLASH QUALCOMM LG DEVICES, LG E400 OPTIMUS L3 UPGRADE GUIDE
LG devices that comes normally with qualcomm CPU in the area of its flashing due to occurance of any software issue that may call for such action will require the use of compatible software made solely for the LG devices at hand while making sure the software version is properly taken note of this can be done only on a pc running on windows XP with the use LG flash tool called (KDZ Tool) which is the tool created by LG for solely the purpose of flashing or updating its device whether Qualcomm, Inferion, CDMA etc.

LG Qualcomm CPU flashing procedure:-
- Make sure to install the LG Android drivers making sure the pc detects the phone with a good hand shake and connection.
- Use a very use of a very healthy USB cable
- Be sure to assert whether the device to be flashed is original LG product
- Charge battery above 30%(percent)
- Do not connect or disconnect any other device from pc
- Close any program that may interfere with the progress of the process as it may lead to flaws in the operating system of the windows which may put the device at the risk of witnessing a corrupt bootLoader which is a very worst case scenario
- Boot device into download mode by pressing the adequate boot buttons like:- pressing volume(+) and volume(-) button and also home button with power button while connecting the USB cable to Launch the device manager to ensure there is good handshake between pc and connect device if not reinstall drivers correctly.
- Select the KDZ file to be flashed on the LG device at hand
- Click on the start button then patiently wait for the KDZ tool to do the extraction of the software before the flashing proper will begin automatically provided it connect properly with the device
- A status bar will appear at the top of the tool showing the progress status and there will be need to wait for the processes to finish to avoid damaging the device
- Disconnect device from pc wait for first boot to complete
TIPS TO NOTE TO AVOID DEAD-LOOP-PRELOADER AFTER FLASHING OR DOING SOFTWARE UPGRADE ON XBOX-DEVICES
STEPS TO TAKE TO AVOID HAVING ERRORS AFTER
UPDATING OR FLASHING XBO DEVICES
Make a backup of necessary device partition before the flashing of new firmwares, the needed file that are to be backup include:-
Uboot, Secro, seccfg, Booting, Preloader, Protect F, Protect S, and all the file should be backed up with the exception of the system and Userdata and cache file. Make it safer so the device could be restored if the internal software gets sundered hence the backup could be done with any software that could backup file on an MTK Devices in scatter format.

Below are The necessary tips which would help an Engineer to have a very positive Result updating XBO Devices:
Make a backup of the preloader partition make sure to know the boot version of the device as flashing a wrong firmware may cause to the device to be hardbricked and can be restored only by test point method.ie RX and TX GND
Before the flashing of XBO devices for example, XBO V3+ which has 2 different boot version: i.e MT6572:- Kitkat Android Version and MT6580 which is Lollipop Android and boot version hence boot versions are completely different but they are made for the Model of XBO devices. Avoid Flashing An XBO device with a ROM that backed up in(BIN) that is been formatted, because it would leave the device with low battery causes undue stress on the devices “BootLoader” hence the device could be dead at the end of the operation.

How to prevent XBO devices and some Infinix Clone devices from having BootLoops
a. Make sure to power down your XBO devices in a situation whereby the battery falls below (10 %) percent.
b. Do not let the device power down by itself because it would lead to a bootloop at the end which would reload the new firmware on the device.
c. Avoid installing unwanted apps on the device which may resulting in dullness or hanging occasionally.
UPGRADING GUIDE FOR LENOVO A3900 QUALCOMM PROCESSOR SD CARD METHOD CPU DEVICE
GUIDE TO SUCCESFULLY UPDATING LENOVO A3900
Flashing of mobile Chinese devices is common these days as they are widely used throughout the day to day activities.
When it comes down to Lenovo as a brand name in the GSM technology scope, Lenovo is not an exception since these devices are electronics and as such are duely expected to develop issues or faults due to use and misuse as they are not high and mobile devices.
As we all know Lenovo devices are widely used across all platforms. In most of these occasions such as home use, office, personal etc.

Tips to Note when Upgrading or Flashing of Lenovo A3900
Always check and know the chipset built Into the devices that is to be precise [the CPU] the Lenovo A3900 comes with a Qualcomm processor, hence the flashing of faulty Lenovo A3900 will require the use of the appropriate tool created for the purpose, therefore the upgrade normally should be done using the qualcomm flash tool if the drivers and correct firmware that has no password lock is produced or at hand.
Upgrading Lenovo A3900
- Guide By Recovery Method
Power off the device by pressing the power buttons for 2 to 3 seconds to switch it off, wait for some seconds for the Android system to fully power down.
Prepare an “SD Card” card preferable a (sandisk) memory card of about 4gb or 8gb preferably, then copy the android firmware into the root of the sd card the firmware should be in zip format. Insert the memory into the memory slot of the device then insert the battery.
Boot the device into Recovery then select the option (apply zip from zip from SD card)
Select yes for the process to begin in full.
After the process finishes installing the ROM then clear cache partition and wipe Factory Reset.
Power on the Android devices and wait for the first boot.
Repairing IMEI on Lenovo A3900 After Flash or Upgrade
As it is normal for most devices to have network related issues after a software change the Lenovo android A3900 do displays network related issues like (invalid IMEI) after the process hence if such happen solution is as follows:-
a. Power off device and do a factory reset
b. Navigate to the settings and erase the device by doing a factory reset of the device.
Lenovo_A3900_4.4.3_20160914 trusted rom
Lenovo_A3900_4.4.3_20160914.rar
Lenovo_A3900_4.4.3_20160914 trusted rom
Lenovo_A3900_4.4.3_20160914.rar
PRECAUTION TO IMPLEMENTATION WHILE UPDATING ITEL 1701, 1702, 1703 TABLET DEVICE
PRECAUTION TO IMPLEMENTATION WHILE UPDATING ITEL 1701, 1702, 1703 TABLET DEVICE
The Itel tablet 1702, 1703 and 1701 family is in the group of the highly used phones and tablets in Nigeria presently and across the world at large.
Therefore they are prone to use misuse and there will be the need for occasional attention towards the device either in the form of hardware repairs or mostly at some points. The errors can be software related because these devices are not by nature high end devices there maybe itches and errors at some points in time.

Below are some commonly exhibited (ERRORS ON ITEL 1701,1702,1703)
Low Battery Life
Low or network strength or signal issues
Boot Loops
Invalid mobile equipment identity [ IMEI ]
Quick battery drain
Monkey Virus Infestation
Constant Rebooting or Hanging Calibration issues resulting from unmatching firmwares
Upgrade Itel 1701 1702 1703 without or Bypassing Inevitable error
In the task of updating spreatrum devices there may be the some errors which may arise by accident and which could leave inexperienced GSM Engineers at Loss or in a state of dilemina they include:-
Irresponsive device which may involve incorrect handshake b/w device and flash tool while the device is still in boot loader mode
Solutions
The engineer should open the back cover of the device and disconnect battery then start all over. Pressing the boot buttons then connect the USB cable and let the tool do its work, if the faults still continues which is if the device fails to be flashed by the SPD flash tool there maybe need to disconnect all the battery legs and resoldering again incase if the device is not detected by the pc the solution is to press the power button together with the boot buttons. Again there may be need recharging the PC incase the battery runs out so the need to plug into power supply maybe needed
HOW TO FLASH OR UPGRADE ALLWINNER TABLETS DEVICES
STEPS IN FLASHING ALLWINNER ANDROID TABLETS AND DEVICES
Most Chinese allwinner tablets are mostly made Chinese (PCB) panels internally, therefore, they are mostly similar in their hardware features. Allwinner Chinese tablets mostly consist of these boot options (A10, A13, A12) therefore these software upgrade procedures should all be alike.

Normally the flashing or upgrade of Chinese devices comes with necessity when the following arises:-
a. BootLoop
b. Hanging or Long duration booting
c. Hardware issues resulting from internal software issues like:- no vibrating, no sound, low network issues
Allwinners devices comes in various types it maybe in the form of a phone or a tablet or even an analogue devices hence the event of flashing or updating the internal software of the device, there would be the need for discretion and expertise


In the aspect of mobile device technology in a scope of its handling in the hand of its end users faults way arise or issues come up which would require the attention and services of hardware hence the device or if necessary occasional hardware repairs.
Allwinner Hardware Errors
· Broken touch or calibration
· Inconsistent or irregularity in network strength
· Damage sound system
· Microphone issues (mouth piece)
· Earpiece disorder (speaker)
· Faulty charging system
· Poor signal strength (antenna issues)
· Temperature overrate (integrated circuit issues)
· Hardware issues from external disorders like(broken caseing)
· Earpiece or Earplug Extention irregular contact (earpiece disorder)
Allwinner tablets at times may develop obstinate software issues which would require the correct flash file or allwinner firmware to be flashed on it.
Allwinner software upgrades procedure
· Disconnect device from external / dc current connections.
· Power off device
· Wait a few minutes for device to fully power down
· Connect a very reliable usb cable to the device
· Install the allwinner device drivers :- [Usb Vid] device would show up at the bottom of the device manager after a successful driver installation
· Open folder containing allwinner flash tool then execute the (exe) file in the folder let the drivers by allowing popups of ( unsigned drivers) which would show up. Open the flash tool then proceed to the folder containing the ROM to be flashed; hence select the ROM to be flashed after carefully and adequate assessment and check of the CPU model and boot number.
· Before the flashing process begins fully make sure to open the shield covering the CPU then check the letters and numbers written in bold letters after that the correct ROM to be flashed on the device can be decided.
· Hold the volume down or volume up hardware buttons then connect the USB cables which should be connected to the USB port of the pc directly.
· Press the power buttons tight or ten (10) times while connecting the USB cable in your PC or Computer. As the progress in the process begins automatically there would be the need to wait for the process to slowly complete at its own pace.
· After the operation completes disconnect the tablet from the pc and enjoy the booting as the process completes its time to check how the new ROM sits and operates with the device
Changes to expect after the upgrade or normal flash of an allwinner device:-
Fortunately if the ROM matches the hardware the ROM contains matches, matches the internal software and as well the major problem which is touch or calibrate [identification] all ways check and take note of the panel model number and find a matching firmware that would eventually settle down well in the tablet and restore the touch back working.
If after the upgrading or normal flash the device witness a missing or invalid [IMEI] due to security software issue consider it time to repair or rewrite the IMEI using Allwinner Imei tool
Monday, 19 June 2017
A GUIDE FOR UPGRADING FLASHING OR UPDATING OF TECNO DROID 7C, 7CS, 7CPRO
A GUIDE TO SUCCESFULLY UPDATING THE TECNO DROID 7C DROID 7CS DROID 7C PRO TABLETS

The tecno 7C droid series and family chain has many eye catching features and designs as altogether which puts them out and stand in the comparising and characteristics with similar devices and as well its software design which is very elegant beautiful and has high programming endowment hence it normally comes with the [Lollipop Android system] putting the end user to the treath of experiencing high quality and highly efficient Android system. The flashing or updating of the tecno droid tablet normally happen in occasions of some software issues which may arise on its own or its induced by the user of the device.
Display issues after flashing network issues [invalid IMEI]
Poor network signal issue battery quick drain or low battery life
Distorted screen resulting issues occasional rebooting and hanging theft code issue (change of sim)
Upgrading Tecno droid 7C 7CS 7CPRO
Below are illustration of the procedure to upgrade the droid Tecno tablets without any much hassle or flaw:-
- make sure software to be flashed when loaded in the flash tool that all needed partitions and regions are well displayed.
- Make sure the scatter file contains the necessary partition listed in the firmware folder in its internal code when edited if not so consider editing or modifying the scatter or downloading another firmware that will ensure all regions are listed in the tool when executed
- Make sure battery level is above 30% before the upgrade process begin to avoid a possibility of having a tablet with dead bootloader at the end of the operation.
- Power down the device and connect the tablet to the pc and wait for pc detection then the flashing operation would start by automated process

Tecno 7C (Tecno-7C-P121-A1-L)
Tecno 7CS (Tecno-7CS-P121-B1-L-KE-Safaricom)
Tecno 7C Pro ( China miracle Box Backup Dump)
Subscribe to:
Posts (Atom)
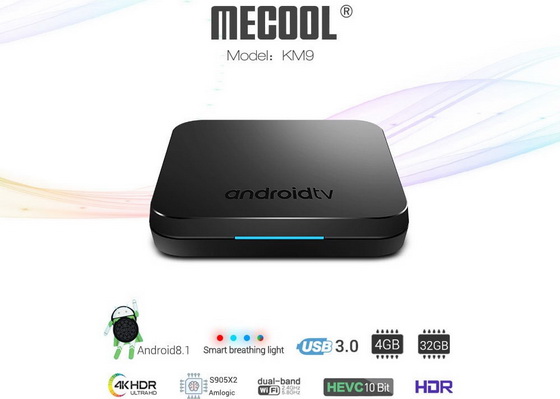
Download Android Pie 9.0 firmware for MECOOL KM9 TV Box
Download Android Pie 9.0 firmware for MECOOL KM9 TV Box Posted in Mar 3, 2019 in Firmwares , 1 comment This firmware is for MECOOL K...
-
Download Amlogic USB Burning Tool v2.0.8 Posted in Aug 06, 2017 in Tutorials, You can use Amlogic USB Burning Tool to flash firmwares from a...
-
Download Android 7.1 stock firmware for R-TV BOX S10 Posted in Jul 19, 2017 in Firmwares, TV Boxes, This firmware is for R-TV BOX...
-
Download latest Android 6.0 stock firmware for MAGICSEE Iron+ TV Box Posted in Jul 30, 2017 in Firmwares , TV Boxes , no comment This...
-
Download Amlogic Burn_Card_Maker v2.0.2 Posted in Feb 13, 2017 in News , 1 comment You can use Amlogic Burn Card Maker to flash firmw...


